RowdyLink
Tracking Attendance
As an administrator with full access to manage events, you have the ability to follow event participation to keep track of who is attending the events that your organization hosts. The first step in this process is, of course, to create your event! Once your event has been approved, you can manage RSVPs and invitations and track attendance for your event.
Event Pass
Similar to the mobile boarding passes used on airlines, every UTSA student, faculty, and staff is provided a secure unique mobile Event Pass for check-in at events. As you show up to events, pull up your Event Pass and the event organizer can scan you in. This automatically connects to your account to ensure you’re assigned participation for the event.
Your Event Pass is a unique code that allows you to quickly check-in to events happening on campus using the Campus Labs® Event Check-in App. If you’re attending an event that requires a pass, continue reading to learn how to pull up your Event Pass.
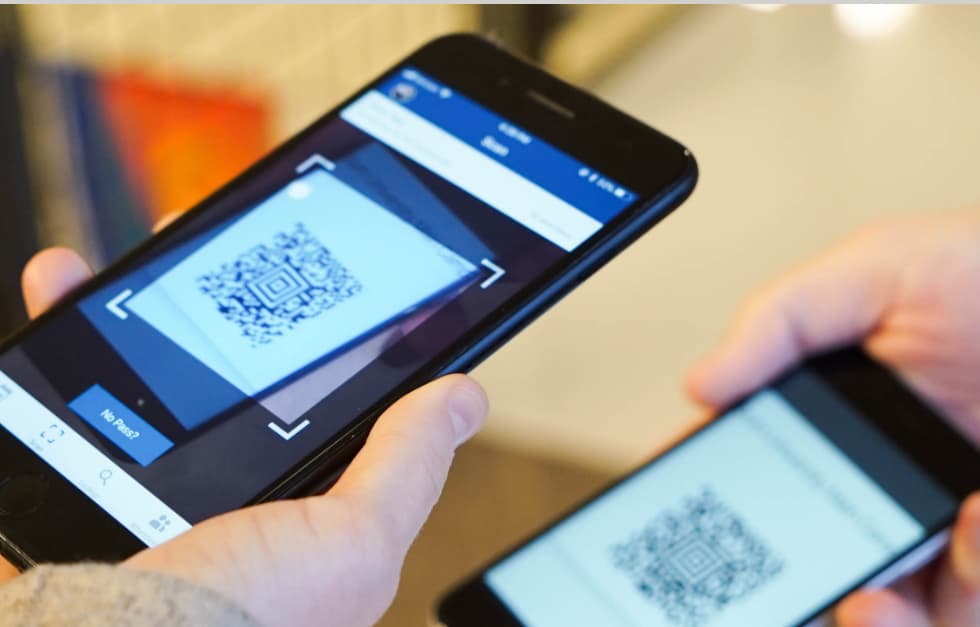
Download Your Event Pass
- Open a browser on your mobile device, laptop or desktop
- Navigate to rowdylink.utsa.edu
- Click "Sign in" on the top right of the site
- Log in with your UTSAID (abc123) and passphrase
- Click on your initial or profile picture on the top right to open the drop down menu
- In the top left corner of the drop down menu, there is a mini QR code
- Click this to display your unique code
If you’re viewing the Event Pass from your mobile browser, you should see the option to add the pass to your Apple Wallet or Android Pay. These options make it easier to access your Event Pass at a later date. You can also choose to take a screenshot of your pass or print it. All of these options will still scan as expected. Once you’ve decided on how to store your Event Pass, get out there and attend an event!
QR Code Check-In
The Event Attendance also includes a QR code option. This code can be added to posters, presentations, other media and, when scanned, will mark the scanner as attended to the Event. You can find the Event QR Code in the event submission. Right click, CTRL + click, or long press (mobile) on the QR code and select “Copy” to copy the image to your clipboard or “Save image as” to download the image to your device.
Virtual Check-In
On the Manage Event page for any Event, you will find an Attendance URL. Any RowdyLink user who visits this link during the event or up to 72 hours after the event ends will be marked as attended for this event. This link can be shared through the chat feature of your online meeting platform of choice, and anyone who clicks on it will essentially be self-reporting their attendance.
Manual Check-In
The first method to assign participation to a user is to click the +Add Attendance button. Here, you have three tabs with different options for adding event participation.
- Invitations - On the Invitations tab, you will see a list of users invited to the event. For each user, select the appropriate level of attendance (Attended, Absent, Excused, or N/A). You can also add additional comments about a user's attendance, if applicable.
- Text Entry - On the Text Entry tab, you can enter attendee information in bulk, using either the users' campus email address or their UTSAID (abc123). So, if you collect users' email addresses during sign-in at an event, you can copy and paste the information into the text entry field and add that attendance data. For each entry, you can also choose the attendance status. Enter up to 500 attendees using this method, with one email or ID per line.
- File Upload - The File Upload tab allows you to enter a .csv or .txt file containing attendees' email addresses or UTSA ID. Select the identifier type, upload the file, assign the proper level of attendance credit and click Upload. Please limit attendance uploads to a maximum of 1,000 records.